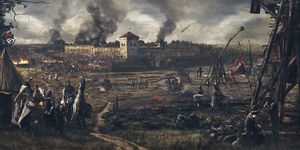
Siege of Kal'Ordholm
|
The Siege of Kal'Ordholm (Dwarven: Krazdan eron Kal'Ordholm) was a seven month long siege during the Eighteen Years' War of the Urguanite fortress of Kal'Ordholm by the Imperial forces of John I, Holy Orenian Emperor and his generals Josef Vladov and Henry Rothesay. The Urguanite defenders were commanded by Grand Marshal Belegar Ireheart, with Richard Revlis commanding the remaining Dunamis presence. Kal'Ordholm had been the site of an Imperial loss many years ago, and was the final Urguanite fortress preventing the Empire from attacking the capital of Kal'Akash.
Prelude
The losses taken by the Imperials at Kal'Valen cost the army many of its seasoned veterans. As a result, Emperor John I was forced to bring in fresh recruits from the Imperial Heartland, many of whom had been under trained and under equipped. Regardless, after filling the ranks with new soldiers, Emperor John I ordered the army to march onwards to Kal'Ordholm. The valley had been the location of a previous loss, one that had cost the lives of many Imperial soldiers, and caused a fear in the hearts of many of the newer recruits. Nevertheless, Rothesay surrounded the keep and set up camp on a hill facing the fortress. Given the keep's proximity to the capital of Kal'Akash, Rothesay's attempted starving of the keep failed, and he was forced to prepare for an assault.
Battle
Duke John of Carnatia had had his Carnatian engineers build multiple siege weapons and a mighty siege tower as well. At the crack of dawn, Rothesay ordered for the bombardment of the castle to begin. Despite multiple volleys fired, the Imperials were unable to form a breach, much due to the lack of experience that the freshly recruited siege engineers had. Rothesay was instead forced to order his infantry to begin pushing the siege tower towards the walls of Kal'Ordholm.
As Imperial footmen began pushing the siege tower, they quickly noticed that the Urguanite defenders had surrounded their keep with sharpened stakes and cacti that was created by Agnar Ireheart. As a result, the siege tower was unable to progress towards the walls of the fortress, halting the Imperials in their tracks. Rothesay ordered for the siege engineers to attempt to tear out the stakes, with the hope of forming a small path for the tower to pass through. However, as the Imperials began their task, the Urguanite defenders fired down on them with stones and arrows, killing many. Seeing that continuing the assault would cause more casualties than were needed, Rothesay called off the assault, retreating back to Kal'Valen.
Aftermath
The failure of the assault halted the Imperial advance into the Urguanite heartland again, and caused public opinion of the war to drop significantly. Morale in the army was extremely low, with footmen and commanders alike condemning the Valley of Flowers and the entire war itself. Emperor John I would withdraw his forces back to Erochland, where he planned to retrain his weary forces, and prepare for another campaign in the future.
